


Setting up the Zapier integration for PERFORM
This guide explains how to connect your gym management system (e.g. Mindbody, GloFox, Zen Planner) to MyStrengthBook PERFORM using Zapier, so that new members are automatically added to your PERFORM dashboard when they join your gym.
What it does
When a new member signs up at your gym, Zapier will automatically send their information to PERFORM. They will appear in your PERFORM dashboard as Pending — you then review and approve them to start their programming.
When a member cancels at your gym, they are automatically removed from PERFORM.
Before you start
You need an active PERFORM subscription on MyStrengthBook
You need a Zapier account — the free plan (zapier.com) is sufficient
Your gym management software must be supported by Zapier (Mindbody, GloFox, Zen Planner, and most major platforms are)
Step 1 — Find your PERFORM credentials
Log in to MyStrengthBook and go to Settings → Preferences → PERFORM
You will see three values in the Zapier integration section:
Webhook URL — the address Zapier will send data to
Coach ID — your unique identifier
API Key — your secret key (keep this private)
Click the copy icon next to each value — you'll need all three in the next steps
ℹ️ If you also use PULL: the API Key is the same on both the PERFORM and PULL settings screens. Generating or rotating it anywhere will affect both integrations.
⚠️ If the Zapier section shows a hint instead of credentials: your PERFORM subscription may not be active yet, or the key has not been generated. Contact support if your subscription is active and the key is still missing.
Step 2 — Create a Zapier account
Go to zapier.com and sign up for a free account
The free plan includes 5 Zaps and 100 tasks/month, which is enough to get started
Step 3 — Create a Zap for new members (member_add)
3a. Set up the Trigger
Click Create Zap
Search for your gym management software (e.g. Mindbody, GloFox, Zen Planner)
Select the trigger event — typically something like New Client, New Member, or New Contact
Connect your gym software account and follow the prompts to authorise it
Test the trigger — Zapier will pull in a sample record so you can map fields in the next step
3b. Set up the Action
Click + to add an action
Search for Webhooks by Zapier and select it
Choose POST as the action event
Fill in the fields:
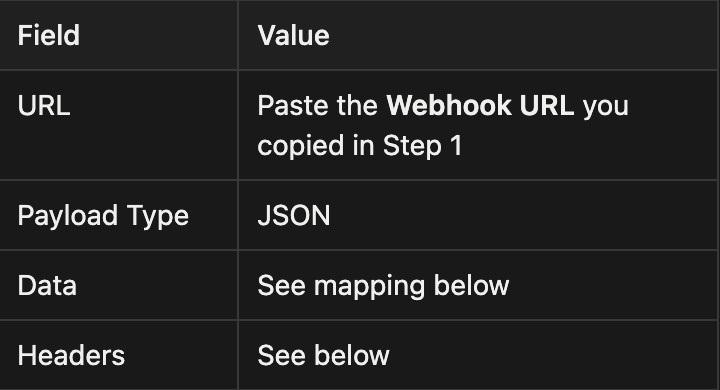
Data mapping (map from your gym system's fields):
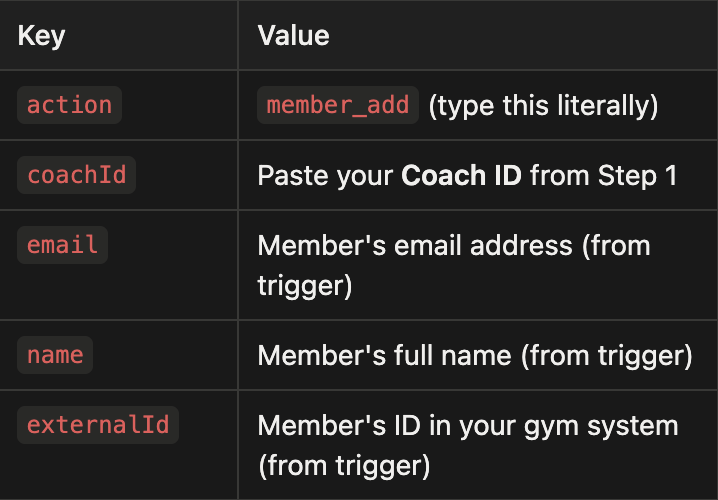
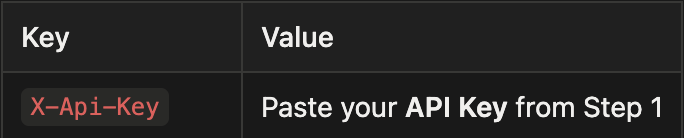
Headers:
Click Test action — you should see a "success": true response
If the test passes, click Publish Zap and give it a name like New gym member → PERFORM
Step 4 — Create a Zap for cancellations (member_remove)
Repeat Step 3 but with these differences:
Trigger event: Choose the cancellation event in your gym software (e.g. Cancelled Client, Member Left)
Data mapping:
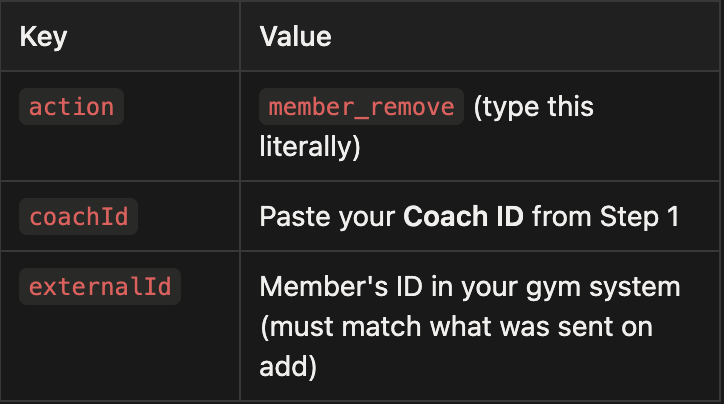
The externalId is how PERFORM matches a cancellation to an existing member, so it must be the same field from your gym system in both Zaps.
Step 5 — Review and approve members in PERFORM
When a new member signs up at your gym, they will automatically appear in your PERFORM dashboard → Access Requests page with a Pending status
Review their details and click Approve to add them to your coaching roster
If you have email notifications enabled (Settings → Preferences → PERFORM → Email on new pending member), you'll receive an email each time someone is added
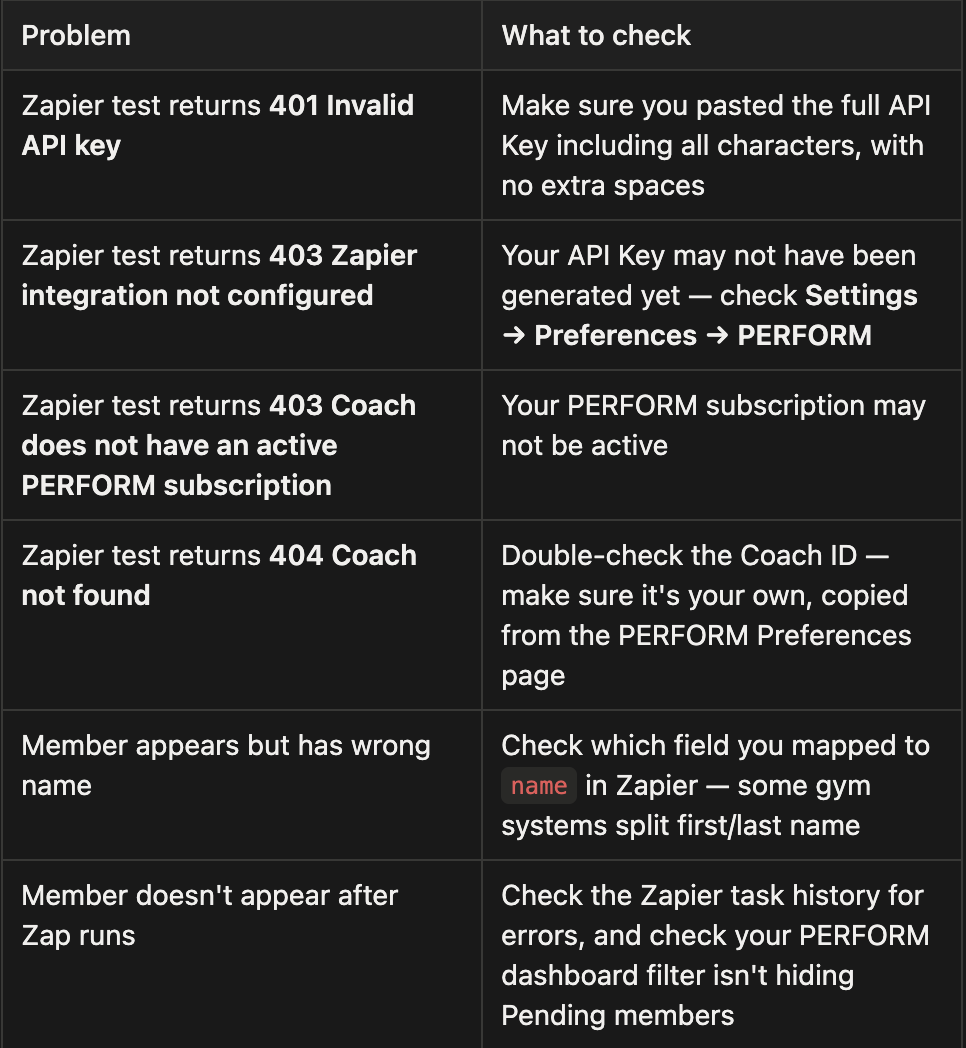
Troubleshooting
Notes
The
externalIdis the member's ID in your gym system (not PERFORM). It's used to match members across add and cancel events, and to prevent duplicates.If a member cancels and then rejoins your gym, PERFORM will automatically reactivate them as Pending for your approval.
Your API Key is private — do not share it publicly. If it is ever compromised, contact support to have it regenerated.
Organization coach flows (sub coaches in an org) are not supported via Zapier in v1. Webhooks must use the account owner's credentials.


No email required
More from the blog


Your coaching deserves a smarter engine
Program, track, and analyze every client across training, nutrition, lifestyle, and education. Less admin, more coaching
Explore PULL ›